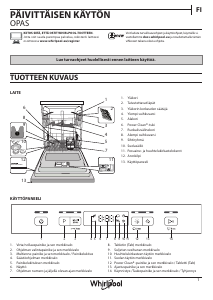
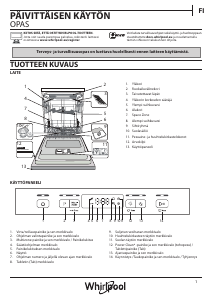
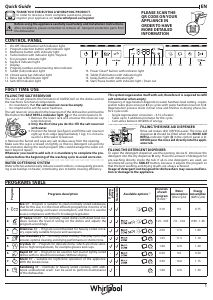
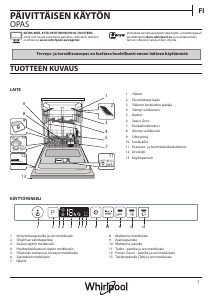
Käyttöohje Whirlpool W8I HF58 TUS Astianpesukone
Tarvitsetko käyttöoppaan Whirlpool W8I HF58 TUS Astianpesukone? Alta voit katsoa ja ladata suomenkielisen PDF-oppaan ilmaiseksi. Tällä tuotteella on tällä hetkellä 12 usein kysyttyä kysymystä, 0 kommenttia ja 0 ääntä. Jos tämä ei ole haluamasi käyttöopas, ota meihin yhteyttä.
Onko tuotteessa vika, eikä käyttöoppaasta ole apua? Siirry Repair Café ‑alueelle etsimään ilmaisia korjauspalveluita.
Käyttöohje
Loading…


Loading…
Arviointi
Kerro meille mielipiteesi Whirlpool W8I HF58 TUS Astianpesukone arvioimalla tuote. Haluatko jakaa tuotekokemuksesi tai kysyä kysymyksen? Jätä kommentti sivun alalaidassa.Lisää tästä ohjekirjasta
Ymmärrämme, että on mukavaa, että sinulla on paperikäyttöinen käyttöopas laitteellesi Whirlpool W8I HF58 TUS Astianpesukone. Voit aina ladata oppaan verkkosivuiltamme ja tulostaa sen itse. Jos haluat alkuperäisen käyttöoppaan, suosittelemme ottamaan yhteyttä osoitteeseen Whirlpool. He saattavat pystyä toimittamaan alkuperäisen ohjekirjan. Etsitkö laitteen Whirlpool W8I HF58 TUS Astianpesukone käyttöopasta toisella kielellä? Valitse haluamasi kieli kotisivuiltamme ja etsi mallinumero nähdäksesi, onko sitä saatavilla.
Tekniset tiedot
| Tuotemerkki | Whirlpool |
| Malli | W8I HF58 TUS |
| Kategoria | Astianpesukoneet |
| Tiedostotyyppi | |
| Tiedoston koko | 216.42 MB |
Kaikki käsikirjat kohteelle Whirlpool Astianpesukoneet
Lisää Astianpesukoneet käsikirjoja
Usein kysytyt kysymykset kohteesta Whirlpool W8I HF58 TUS Astianpesukone
Tukitiimimme etsii hyödyllisiä tuotetietoja ja vastaa yleisiin kysymyksiin. Jos huomaat yleisissä kysymyksissä virheen, kerro siitä meille yhteydenottolomakkeella.
Kun astianpesukoneeni on käynyt ohjelmansa loppuun, näen että tablettilokero ei ole avautunut. Mistä tämä voi johtua? Todennettu
Tämä ongelma johtuu usein siitä, että astiat estävät lokeron avautumisen. Tarkasta tämä ennen astianpesukoneen käynnistämistä.
Tästä oli apual (8364) Lue lisääAstianpesukone ei enää lämmitä vettä, miksi se on? Todennettu
On todennäköistä, että lämmityselementti on viallinen. Pyydä se vaihtamaan. Jos olet epävarma, ota yhteyttä valmistajaan.
Tästä oli apual (8159) Lue lisääVoiko astianpesukoneeseen laittaa tavallista suolaa? Todennettu
Ei. Tavallinen suola saattaa sisältää aineita, jotka voivat vahingoittaa kodinkonetta.
Tästä oli apual (3469) Lue lisääOnko minun huuhdeltava astiat ennen kuin laitan ne astianpesukoneeseen? Todennettu
Astioiden huuhtelu ei ole välttämätöntä, mutta sinun on poistettava kaikki suuret, kovat ja rasvaiset jäänteet. Nämä voivat tukkia viemärin ajan myötä.
Tästä oli apual (1425) Lue lisääVoinko avata astianpesukoneen käydessä? Todennettu
Useimmissa astianpesukoneissa on vesipysäytys, jolloin ohjelma pysähtyy heti, kun luukku avataan, eikä vettä tule ulos. Joissakin malleissa tämä voi aiheuttaa ongelmia ajan myötä. Sisäänrakennetuilla astianpesukoneilla on mahdollista, että astianpesukoneen säännöllinen avaaminen käynnissä voi aiheuttaa vesivahinkoja lepotiloihin vapautuneen höyryn takia.
Tästä oli apual (1209) Lue lisääPitäisikö minun avata astianpesukone sen käytön loputtua, jotta astiat kuivuvat nopeammin? Todennettu
Tämä riippuu astianpesukoneen tyypistä ja sijainnista. Jotkut astianpesukoneet on varustettu ominaisuudella, joka kuivaa astiat pesuohjelman jälkeen. Tällöin astianpesukoneen avaamisella ei ole lisäarvoa. Sisäänrakennetuilla astianpesukoneilla on mahdollista, että astianpesukoneen säännöllinen avaaminen käynnissä voi aiheuttaa vesivahinkoja lepotiloihin vapautuneen höyryn takia.
Tästä oli apual (971) Lue lisääMitä tarkoittaa '6th Sense'? Todennettu
Whirlpool-laitteissa, jotka on varustettu 6th Sense -tekniikalla, on anturit, jotka takaavat koneen optimaalisen toiminnan. Esimerkiksi kuivaimissa nämä anturit mittaavat pesuun jääneen kosteuden ja pysäyttävät koneen, kun kaikki on täysin kuivaa.
Tästä oli apual (898) Lue lisääAstianpesukoneen syklin päätyttyä muoviastiat ovat edelleen märät, mutta loput eivät ole. Miksi niin? Todennettu
Muovi on huono lämmönjohdin, joka antaa tuotteiden jäähtyä nopeasti. Sen päälle jäävä kosteus haihtuu sitten paljon vähemmän kuin esimerkiksi keramiikalla tai metallilla.
Tästä oli apual (868) Lue lisääVoinko liittää astianpesukoneen jatkojohtoon? Todennettu
Laitteita, jotka vaativat paljon virtaa, kuten astianpesukonetta, ei voida liittää kaikkiin jatkojohtoihin. Katso astianpesukoneen virrankulutus, joka on ilmoitettu watteina, ja tarkista, käsitteleekö jatkojohto cn tätä. On olemassa jatkojohtoja paksummilla kaapeleilla, jotka on tehty käsittelemään suurempia laitteita.
Tästä oli apual (813) Lue lisääOnko ongelma, että astianpesukoneen sisäpuolella on naarmuja metalliin? Todennettu
Useimpien astianpesukoneiden sisäpuoli on valmistettu ruostumattomasta teräksestä, eikä naarmut vaikuta niihin.
Tästä oli apual (810) Lue lisääVoinko laittaa teflonipannuja astianpesukoneeseen? Todennettu
Kyllä sinä voit. Pannu kuluu kuitenkin nopeammin kuin käsin puhdistettaessa. Kun puhdistat pannua teflonilla käsin, älä koskaan käytä hankausainetta, vaan käytä pehmeää sienellä tai liinalla.
Tästä oli apual (810) Lue lisääVoinko laittaa astiat, kuten lastat ja leikkuulaudat, astianpesukoneeseen? Todennettu
Puuesineet voivat vahingoittua tai vääntyä astianpesukoneessa. Myös vapautuvat puukuidut voivat vahingoittaa astianpesukonetta. Puiset leikkuulaudat valmistetaan usein liimalla, joka voi irrota, kun olet ollut astianpesukoneessa useita kertoja.
Tästä oli apual (809) Lue lisää

Keskustele tuotteesta
Täällä voit jakaa mielipiteesi Whirlpool W8I HF58 TUS Astianpesukone:sta. Jos sinulla on kysyttävää, lue ensin huolellisesti käyttöohje. Käsikirjaa voi pyytää yhteydenottolomakkeellamme.