4
NOTE:
• The battery charger is for charging Makita-battery cartridge.
Never use it for other purposes or for other manufacturer’s
batteries.
• If charging light may ash in red color, battery condition is as
below and charging may not start.
– Battery cartridge from just-operated tool or battery cartridge
that has been left in a location exposed to direct sunlight for
a long time.
– Battery cartridge that has been left for a long time in a location
exposed to cold air.
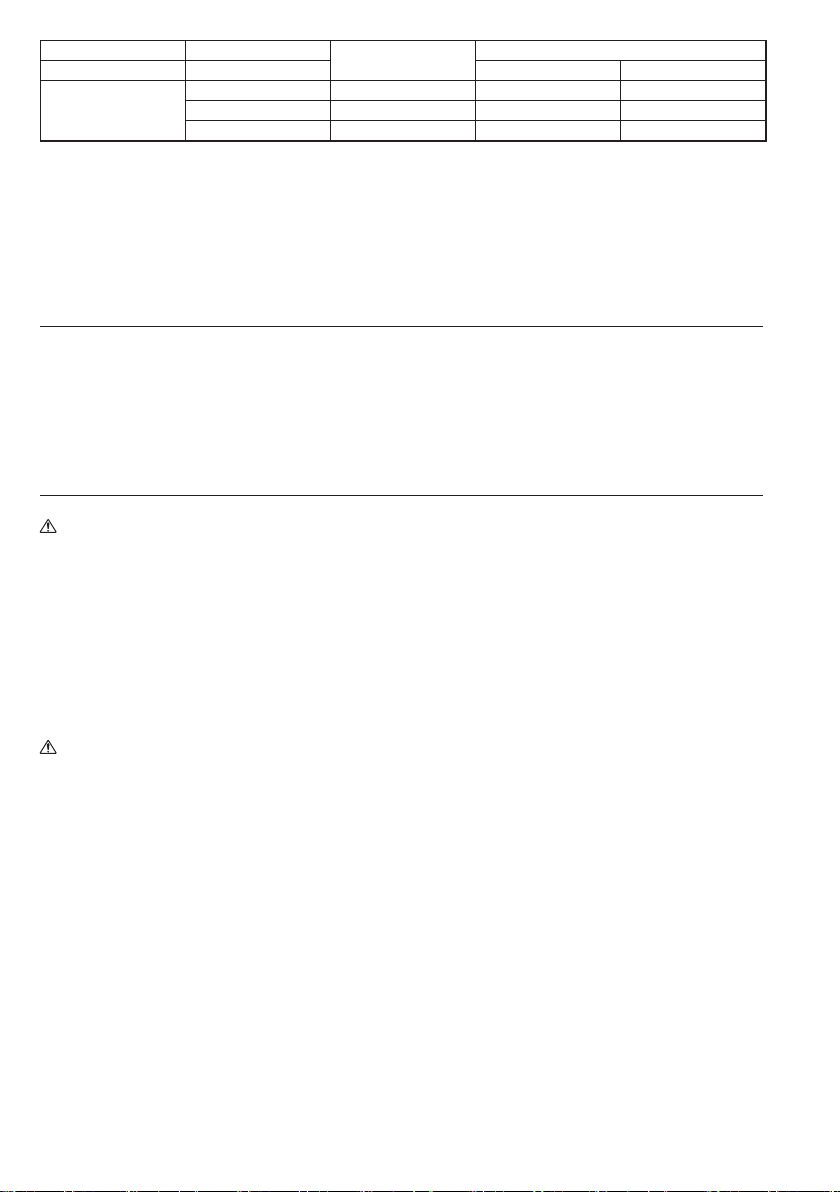
Voltage 10.8 V – 12 V (max.)
Capacity (Ah)
according to IEC61960
Charging time (Minutes)
Number of cells 3 DC10SB DC10WD
Li-ion Battery cartridge
BL1016 1.5 22 50
BL1021B 2.0 30 70
BL1041B 4.0 60 130
When the battery cartridge is too hot, charging does not begin
until the battery cartridge temperature reaches the degree at
which charging is possible.
• If the charging light ashes alternately in green and red color,
charging is not possible. The terminals on the charger or battery
cartridge are clogged with dust or the battery cartridge is worn
out or damaged.
Cooling system (only for DC10SB)
• This charger is equipped with cooling fan for heated battery in
order to enable the battery to prove its own performance. Sound
of cooling air comes out during cooling, which means no trouble
on the charger.
• Yellow light will ash for warning in the following cases.
– Trouble on cooling fan
– Incomplete cool down of battery, such as, being clogged with
dust
The battery can be charged in spite of the yellow warning light.
But the charging time will be longer than usual in this case.
Check the sound of cooling fan, vent on the charger and battery,
which can be sometime clogged with dust.
• The cooling system is in order although no sound of cooling fan
comes out, if the yellow warning light will not ash.
• Always keep clean the vent on charger and battery for cooling.
• The products should be sent to repair or maintenance, if the
yellow warning light will frequently ash.
Wall mounting
Warning:
• Make sure to use two screws for hanging the charger on the wall,
and anchor the charger on the wall with another screw.
Otherwise the charger may fall and cause serious injury.
• Always be sure that the charger is unplugged and all the
batteries are removed from the charger before performing wall
mounting work.
• Follow the steps instructed in this manual, and complete the
whole procedures at once. The charger may fall and cause injury
or damage if you stop the work in the half way.
• Check tightness of the screws on regular basis. Otherwise the
charger may fall because of loosen screw.
• Clean the terminal parts of the charger on regular basis with an
air duster etc.
Caution:
• Carefully choose a stable wall for mounting the charger.
Make sure there is no hindrance to mounting work or charging
operation. The gross weight of the charger and battery reach
approximately 1.1 kg (2.43lbs) (DC10SB) / 0.8 kg (1.76lbs)
(DC10WD), provide sufcient reinforcement for the wall if
necessary.
Things you need to prepare:
– Two screws - for hanging the charger.
Screw size : 4mm x more than 20mm
(5/32” x more than 13/16”).
Screw head size : ø9.0mm or less and less than 3.5mm
thickness. (ø11/32” x 1/8”).
– One screw (4mm (5/32”) x more than 25mm (1”)) - for anchoring
the charger.
– One more screw (only for DC10SB) (4mm (5/32”) x more than
40mm (1-9/16”)) - for supporting the charger.
– Tools - for tightening screws.
You can mount the charger on the wall either horizontal or vertical
direction. (Fig. 1&2)
1. Fix the two screws for hanging on the wall as illustrated.
(Fig. 3)
2. Hang the charger with the screws xed in step 1.
3. Mount the charger on the wall by tightening the anchor
screw completely. (Fig. 4)
(For DC10SB it is needed one more screw for supporting the
charger on the wall.)


Keskustele tuotteesta
Täällä voit jakaa mielipiteesi Makita DC10SB Akkulaturi:sta. Jos sinulla on kysyttävää, lue ensin huolellisesti käyttöohje. Käsikirjaa voi pyytää yhteydenottolomakkeellamme.