Käyttöohje Electrolux EER77MBM Pölynimuri

Tarvitsetko käyttöoppaan Electrolux EER77MBM Pölynimuri? Alta voit katsoa ja ladata suomenkielisen PDF-oppaan ilmaiseksi. Tällä tuotteella on tällä hetkellä 10 usein kysyttyä kysymystä, 0 kommenttia ja sillä on 1 ääni ja tuotteen keskimääräinen luokitus on 100/100. Jos tämä ei ole haluamasi käyttöopas, ota meihin yhteyttä.

Onko tuotteessa vika, eikä käyttöoppaasta ole apua? Siirry Repair Café ‑alueelle etsimään ilmaisia korjauspalveluita.

Käyttöohje

Loading…

2www.electrolux.com
1 2
3
4
2
ENGLISH
Thank you for choosing an Electrolux ERGORAPIDO® vacuum cleaner. In
order to ensure the best results, always use original Electrolux accessories
and spare parts. They have been designed especially for your vacuum
cleaner. This product is designed with the environment in mind. All plastic
parts are marked for recycling purposes.
DESCRIPTION OF ERGORAPIDO®
A. ON/OFF button
B. Power regulation button
C. ON/OFF button, hand unit
D. Locking screw
E. Release button, hand unit
F. Charging station, wall unit
G. Charging station,  oor unit
H. Charging adapter
I. Fine  lter (inner  lter)
J. Pre  lter (outer  lter)
K. Release button, dust container
L. Dust container
M. Dusting brush
N. Crevice nozzle
O. Cable protector grill
P. Hatch cover for brush roll
Q. Brush roll
R. BRUSHROLLCLEAN® pedal*
S. Nozzle front lights
T. Charging indicator
U. Cli hanger
V. Slot for accessory storage
* Not on models EER71xxx,
EER72xxx, EER73xxx
BEFORE STARTING
Check that the package includes all parts described in this instruction
manual and read this manual carefully. Pay special attention to the safety
precautions chapter. Save these instructions.
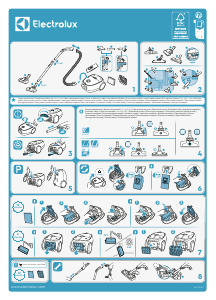
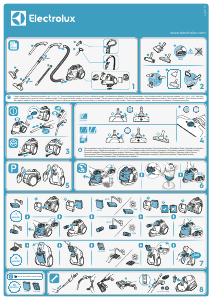
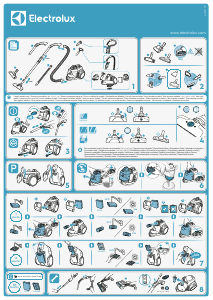
1 Assemble the handle.
2 Assemble the charge stand.
3 There is a hollow space in the bottom of the charging station where
unused cable can be wound. Insert the adaptor into the mains and
position the charging station on a stable and horizontal surface away
from heat sources, direct sunlight or wet places.
4 The charging indicator will be lit when ERGORAPIDO
®
is placed in the
charging station.
CHARGING ERGORAPIDO®
5 When fully charged, the charging indicator will blink slowly. The num-
bers of LED lamps will indicate the level of charge.
Full charging time is
around 4hours. For better battery performance, charge ERGORAPIDO®
for 24hours before  rst use and always keep it on charge when not
used.
VACUUMING WITH ERGORAPIDO®
Before vacuuming, check that the nozzle wheels and the brush roll are
clean from sharp objects in order to avoid scratching sensitive  oors
and to ensure full cleaning performance.
6 Start and stop ERGORAPIDO
®
by pushing the ON/OFF button.
ERGORAPIDO
®
will start on the high power mode.
For more silent cleaning and longer runtime, press the power regula-
tion button.
VACUUMING FURNITURE, CAR SEATS ETC.
7 Press the button to release the hand unit from the main body.
8 Attach the crevice nozzle to facilitate cleaning of areas di cult to reach.
Attach the brush on the crevice nozzle for dusting.
9 The crevice nozzle and small brush can be stored in the charging sta-
tion or in the slot on the back side of the handle.
BRUSHROLLCLEAN® FUNCTION (CERTAIN MODELS ONLY)
Use the BRUSHROLLCLEAN® function to keep the brush roll clean and
free from hair and  bres. For best results use the BRUSHROLLCLEAN®
function when ERGORAPIDO® is fully charged.
10 Place ERGORAPIDO
®
on a hard and  at surface. Do not use the BRUSH-
ROLLCLEAN
®
function on carpets.
Press the BRUSHROLLCLEAN
®
pedal with your foot while the cleaner is
on. Hold for 5 seconds until hairs and  bres are removed. There will be
a cutting noise during this process, this is normal. If hairs remain on the
brush roll, repeat the process.
The BRUSHROLLCLEAN
®
function is equipped with an overheating
protection. If the BRUSHROLLCLEAN
®
function has been used for more
than 30 seconds (constant or interrupted) it will deactivate the brush
roll and turn o the nozzle front lights. The vacuum cleaner can still
be used, even when the BRUSHROLLCLEAN
®
function is deactivated.
Toreactivate the BRUSHROLLCLEAN
®
function, place ERGORAPIDO
®
on
charge and charge for 15minutes.
Please note that the BRUSHROLLCLEAN® function might not be able to
remove thicker threads or wires that are caught in the brush roll.
EMPTYING OF THE DUST CONTAINER
11 Remove the dust container by pressing the buttons.
12 Take out the  lters from the dust container by pressing the release but-
tons.
Empty the contents into a dustbin. Never wash the dust container
or  lters in a dishwasher.
IMPORTANT - FILTER CLEANING!
13 The  lters must be cleaned at regular intervals to ensure a high clean-
ing performance.
Take out the  lters by pressing the release buttons.
Separate the inner  lter from the outer  lter.
14 Rinse the  lter parts carefully under lukewarm water without using any
detergents. (Never use the dishwasher or washing machine.) S
hake to
remove excess water and leave to dry minimum 12h before putting
them back into the cleaner.
CLEANING THE HOSE AND NOZZLE WHEELS
15 Loosen the hose behind the nozzle from its upper connection. Remove
any object or debris that can be blocking the air ow in the hose or in
the air channel to the dust cup, and put the hose back.
16 If the wheels need to be cleaned or get jammed, remove them carefully
by using a  at screwdriver.
REMOVING AND CLEANING THE BRUSH ROLL
17 If the brushroll gets blocked ERGORAPIDO® will stop. Open the cable
protector grill and the brush roll hatch cover and remove the brush roll.
18 Us
e a pair of scissors to remove threads etc. Reassemble the brush roll,
making sure it can spin freely.
REMOVING THE BATTERIES FOR RECYCLING
Warning; Battery removal must only be done by an Electrolux
service center or o cial collection point!
19 Only remove batteries if the product is to be scrapped. Improper
handling of the batteries may be hazardous. Batteries should always
be completely discharged before removal.
Take your product to an
Electrolux service center or o cial collection point for recycling. They
can remove and recycle the battery and electric parts in a safe and pro-
fessional way. Follow your country’s rules for collection of rechargeable
batteries and electrical products.
Enjoy a great cleaning experience with ERGORAPIDO®!
3www.electrolux.com
GB
FR
AR
BG
GR
NO
CZ
HR
PL
DE
HU
PT
DK
IT
RO
EE
LT
RU
ES
LV
SE
SL
FI
NL
SK
SR
TR
UA
11
9 10
12 13 14
65 7 8
15 17 1816
19
3www.electrolux.com
Lataa käyttöohje suomalainen (PDF, 3.39 MB)
(Mieti ympäristöä ja tulosta tämä käyttöopas vain, jos se on todella tarpeen)

Loading…

Arviointi

Kerro meille mielipiteesi Electrolux EER77MBM Pölynimuri arvioimalla tuote. Haluatko jakaa tuotekokemuksesi tai kysyä kysymyksen? Jätä kommentti sivun alalaidassa.
Oletko tyytyväinen kohteeseen Electrolux EER77MBM Pölynimuri?
Kyllä Ei
100%
0%
1 ääni

Keskustele tuotteesta

Täällä voit jakaa mielipiteesi Electrolux EER77MBM Pölynimuri:sta. Jos sinulla on kysyttävää, lue ensin huolellisesti käyttöohje. Käsikirjaa voi pyytää yhteydenottolomakkeellamme.

Lisää tästä ohjekirjasta

Ymmärrämme, että on mukavaa, että sinulla on paperikäyttöinen käyttöopas laitteellesi Electrolux EER77MBM Pölynimuri. Voit aina ladata oppaan verkkosivuiltamme ja tulostaa sen itse. Jos haluat alkuperäisen käyttöoppaan, suosittelemme ottamaan yhteyttä osoitteeseen Electrolux. He saattavat pystyä toimittamaan alkuperäisen ohjekirjan. Etsitkö laitteen Electrolux EER77MBM Pölynimuri käyttöopasta toisella kielellä? Valitse haluamasi kieli kotisivuiltamme ja etsi mallinumero nähdäksesi, onko sitä saatavilla.

Tekniset tiedot

Tuotemerkki Electrolux
Malli EER77MBM
Kategoria Pölynimurit
Tiedostotyyppi PDF
Tiedoston koko 3.39 MB

Kaikki käsikirjat kohteelle Electrolux Pölynimurit
Lisää Pölynimurit käsikirjoja

Usein kysytyt kysymykset kohteesta Electrolux EER77MBM Pölynimuri

Tukitiimimme etsii hyödyllisiä tuotetietoja ja vastaa yleisiin kysymyksiin. Jos huomaat yleisissä kysymyksissä virheen, kerro siitä meille yhteydenottolomakkeella.

Pölynimurini letku on tukossa, mitä voin tehdä? Todennettu

Irrota letku ja tarkasta, onko letku todella tukossa, katsomalla sen sisään. Jos letku on tukossa, voit ottaa pitkän esineen, kuten harjanvarren, ja työntää sen varovasti letkun läpi. Yleensä esineet, jotka tukkivat letkun, lähtevät tällä tavalla pois. Jos tämä ei auta, ota yhteyttä valmistajaan.

Tästä oli apual (1464) Lue lisää

Minkä kokoisia pölypusseja on? Todennettu

On otettava huomioon kaksi kokoa. Ensimmäinen on levyn koko pussin sisäänkäynnin kanssa. Tämä määrittää, sopiiko pölypussi tiettyyn pölynimuriin. Sitten on pussin koko. Tämä ilmoitetaan enimmäkseen litroina ja määrittää, kuinka paljon pölyä pussiin mahtuu.

Tästä oli apual (941) Lue lisää

Haluan tietää, kuinka vanha Electrolux-kodinkoneeni on. Miten toimin? Todennettu

Tuotteen iän voi selvittää sarjanumeron avulla. Se löytyy laitteesta. Sarjanumeron ensimmäinen merkki osoittaa vuoden (esim. 1 = 2001) ja kaksi seuraavaa numeroa valmistusviikon (esim. 35 = kyseisen vuoden viikko 35). Sarjanumero 13500016 kertoo siis, että kone on valmistettu vuoden 2001 viikolla 35.

Tästä oli apual (835) Lue lisää

Pölynimurin virtajohto ei palaa takaisin laitteeseen, mitä voin tehdä? Todennettu

On mahdollista, että johdossa on kierre tai taite. Rullaa johto kokonaan ulos muutama kerta ja kelaa se takaisin laitteeseen käsien ohjaamana. Jos tämä ei ratkaise ongelmaa, on mahdollista, että johdon kelausmekanismi on rikki. Ota tällöin yhteyttä valmistajaan tai korjauspalveluun.

Tästä oli apual (657) Lue lisää

Pölynimurini antaa viheltävän äänen, mitä voin tehdä? Todennettu

Tämä ongelma johtuu usein täydestä pölypussista tai suodattimesta tai kun on aukko, joka päästää ilman letkuun. Tarkista pölypussi ja suodatin ja vaihda ne tarvittaessa. Tarkista, ettei letkussa ole reikiä tai vikoja. Jos tämä ei ratkaise ongelmaa, ota yhteyttä valmistajaan.

Tästä oli apual (551) Lue lisää

Kuinka poistan pölyn ja hiukset pölynimurin harjaspäästä? Todennettu

Pölyn ja hiusten poisto pölynimurin harjaspäästä on tehty manuaalisesti. Jos tämä ei mene toivotulla tavalla, jäljellä olevan lian voi poistaa hienolla kampauksella.

Tästä oli apual (536) Lue lisää

Mitä asetuksia pölynimurin harjaspäässä minun pitäisi käyttää? Todennettu

Lähes kaikissa pölynimureissa on pää, jossa on säädettävä harja. Käytä harjaa koville pinnoille naarmujen ja vaurioiden estämiseksi. Sammuta harja matot.

Tästä oli apual (419) Lue lisää

Voinko käyttää paperipölypussia useammin kuin kerran? Todennettu

Tämä ei ole suositeltavaa. Pussin vesihuokoset kyllästyvät aiheuttaen menetyksiä imussa ja mahdollisesti vahingoittamalla moottoria.

Tästä oli apual (286) Lue lisää

Mikä on HEPA? Todennettu

HEPA tarkoittaa korkean hyötysuhteen hiukkasilmaa. Monissa pölynimureissa on HEPA-suodatin. HEPA-suodatin pysäyttää vähintään 85% ja enintään 99,999995% kaikista 0,3 mikrometrin (µm) tai sitä suuremmista hiukkasista.

Tästä oli apual (258) Lue lisää

Voinko käyttää tavallista pölynimuria imemään tuhkaa? Todennettu

Ei, se ei ole ehdottomasti mahdollista. Tuhka, joka näyttää jäähtyneeltä, voi silti olla lämmin tai jopa kuuma sisällä. Tavallista pölynimuria ei ole tarkoitettu tähän ja se voi aiheuttaa tulipalon. Tavallisten pölynimureiden suodattimet eivät myöskään aina sovi pidättämään erittäin pieniä hiukkasia, kuten tuhkaa. Sitten se voi päästä pölynimurin moottoriin ja vahingoittaa.

Tästä oli apual (251) Lue lisää
Käyttöohje Electrolux EER77MBM Pölynimuri

Liittyvät tuotteet

Aiheeseen liittyvät luokat