
4 5
5. When you have nished expressing, disassemble the breast pump. Clean the parts according to the
Cleaning and Sterilising section.
NOTE! The breast pump, silicone tube with connectors, power adapter and USB cable cannot be washed
or sterilised in water. To clean, wipe with a cloth.
NOTE! Each time the phase of expression is changed, the duration of the selected phase is counted from
the beginning.
NOTE! The breast pump switches o automatically after 30 min. of work. If you want to stop pumping
earlier, touch the ON/OFF icon and turn o the breast pump.
NOTE! Before putting the breast pump away from the breast, make sure it is turned o. If necessary, you
can put the breast pump away during pumping by placing your nger between the pad and the breast
(just as you do it when putting the child away).
CLEANING AND STERILISING
Disassemble the breast pump. Before rst and after each use, wash all parts that come in direct contact
with milk, diaphragm cover (g 1.d), diaphragm (g. 1.c), breast pump body with funnel (g. 1.b), silicone
massage cushion (g. 1.a), funnel cover (g. 1.g), silicone anti-return valve (g. 1.e), bottle adaptor (g. 1.o)
and bottle (g. 1.f), in warm water with mild detergent and place them in boiling water for 5 minutes to
ensure hygiene. Dry all components thoroughly before use.
Note! Do not leave components on the bottom of the pot. Stir the water during sterilisation to prevent
damage to components.
The silicone components in contact with the milk, i.e. the diaphragm (g. 1.c), silicone massage cushion
(g. 1.A) and silicone anti-return valve (g. 1.e), can be sterilised in an electric steriliser.
Attention! Before each use, check the condition of the individual parts for cracks, tears, discoloration, or
deterioration as these may aect the performance of the device.
How to disinfect the teat?
Before rst and each use wash all parts of the product and disinfect. Place for 5 min in boiling water. This
is to ensure hygiene. Clean before each use. Boiling and hard water may create lime scale eect. Wash
all parts thoroughly with clean water, including areas that may be invisible but where food has passed,
to remove any food residues. After using, remove the remaining food from the bottle and the teat, rinse,
wash and disinfect in a steam/electric sterilizer or in boiling water. Bottle can be washed in dishwasher
(max. temp. 60°C). It is not recommended to place the teat in a dishwasher. Hard chemicals / detergents
may damage the product. Do not use any antibacterial agents. Inspect the feeding teat before each use
and pull the feeding teat in all directions. Especially when the baby has teeth. Throw away at the rst signs
of damage or weakness. Do not tighten up the bottle locking ring, as it may disturb the teat’s ventilation.
Always check for leakage. Never enlarge the teat ow holes by any means, as it can damage the teat.
Take particular care when heating in a microwave. Always stir heated food to ensure even distribution
of temperature and check liquid temperature before giving it to the child. When warming food in a
microwave, remember to leave the bottle open. Do not place product in hot oven or heat in a gas/electric
cooker. Do not leave a feeding teat in direct sunlight or heat, or leave in disinfectant (“sterilising solution”)
for longer than recommended, as this may weaken the teat. It is recommended to replace a teat max. after
2 months of use. Retain the instruction for later use. Bottle made from Polypropylene. Batch code is placed
on the packaging.
For your child’s safety and health
WARNING!
Continuous and prolonged sucking of uids will cause tooth decay.
Always check food temperature before feeding.
Throw away at the rst signs of damage or weakness.
Keep components not in use out of the reach of children.
Never attach to cords, ribbons, laces or loose parts of clothing. The child can be strangled.
Never use feeding teats as a soother.
Always use this product with adult supervision.
NOTE!
• Do not use this product for purposes other than those listed in this user manual.
• Do not place the product near sources of re.
• Before using the breast pump, make sure that all parts were assembled correctly.
• If you feel breast or nipple discomfort, stop using the breast pump immediately.
• Wash your hands before using the product.
•Keep the product out of the reach of newborns and children.
• Do not drop or hit the product to avoid damage.
• Do not touch product elements with bare hands immediately after sterilisation in boiling water to avoid
burns.
Do not resell a used device.
MILK STORAGE
1. Due to the active biochemical and microbiological processes occurring in the milk, it is important to
maintain a constant temperature of storage.
2. Expressed milk store in bottles, special sterile bags or sealed containers with a lid (which should be
disinfected before use).
3. Mark each container with the date.
4. Freeze only fresh milk. Do not ll a container fully as frozen breast milk increases its volume.
5. Breast milk can be heated in the same way as any other food (but never in the microwave as this may
destroy valuable nutrients and antibodies).
6. Frozen breast milk can be defrosted overnight in the refrigerator and then warmed gradually in a bottle
warmer or hot water.
7. After defrosting, shake the container or stir the milk to mix the separated fat particles with the remaining
volume of milk.
8. DO NOT store milk on shelves placed on a refrigerator door.
9. NEVER refreeze previously defrosted milk.
10. DO NOT add fresh breast milk to defrosted milk.
11. DO NOT add fresh breast milk to frozen milk.
12. NEVER heat breast milk by boiling or putting it in the microwave.
13. ALWAYS check the liquid temperature before feeding.
14. Dispose of any milk that has not been used.
GB
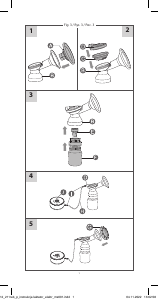
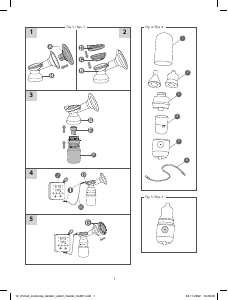
PARTS g. 1
a. Silicone massage cushion
b. Breast pump body
c. Silicone diaphragm
d. Cover
e. Silicone anti-return valve
f. Bottle
g. Funnel cover
h. Silicone tube
i. Tube connectors 2 pcs
j. Pump unit with control panel
k. Bottle cap
l. Screw ring
m. Teat
n. Sealing disk
o. Bottle adapter
p. Power adapter
q. Charging cable
Illustrations in this user manual are for reference only. Please refer to the actual product.
The silicone anti-return valve, silicone massage cushion and tube are wear parts. If you notice wear and tear,
purchase replacement parts from an authorised retailer.
NOTE! Always remove the anti-return valve by grasping its round base with two ngers. Never grasp the tip
of the valve, as it can be damaged and weaken the suction power. Wash the non-return valve very gently
and do not allow food to dry inside it.
Note! Before each use, check the condition of all parts for cracks, tears, discolouration or deterioration, as
these may aect the eectiveness of the device.
CONTROL PANEL g. 2
1. Suction level
2. ON/OFF
3. Level down
4. Battery level
5. Control panel
6. Mode selection
7. Level up
ASSEMBLY g. 3
NOTE! Take special care when assembling and disassembling the breast pump to avoid damage to its
components.
1. Place the silicone massage cushion (g. 1a) in the funnel. Stretch its edges over the edges of the funnel
(g. 1b) so that they are tted tightly.
2. Place the diaphragm (g. 1c) in the cup at the top of the body (g. 1b) so that they t precisely. Press the
edges of the diaphragm. Then place the diaphragm cap (g. 1d).
3. Place the valve (g. 1e) in the hole on the underside of the breast pump body (g. 1B) by pushing it to the
end. Screw the adapter onto the bottle (g. 1f). Screw the whole set to the underside of the body (g.1b)
so that they form one unit.
4. Connect one end (g. 1i+h) of the tube to the top cover (g. 1d) and the other end (g. 1i+h) to the pump
(g. 1j). Make sure that the tube is not tangled.
5. Fit the funnel cover (g 1g)
NOTE! Before rst use, fully charge the battery. The breast pump has a rechargeable lithium-ion battery
and does not require AA batteries or a permanent connection to the mains. Once fully charged, stop
charging to avoid damaging the battery. To extend the life of the battery, do not let it run down fully.
The battery is charged via the power adapter. To charge the battery, connect one side of the charging
cable to the breast pump and the other part to the power adapter. Then plug the power adapter into a
power socket. It takes about 150 minutes to fully charge the breast pump’s battery. When the battery is
fully charged, the battery LED indicator will stop ashing. The breast pump can be charged at any time.
You don’t have to wait for the battery to be fully discharged. On a full charge, the breast pump can run for
around 120 minutes.
The breast pump has a built-in timer and automatically switches o after 30 minutes of continuous
operation. If you want to restart the device, press the ON/OFF button.
USER MANUAL
Before each use:
• Wash your hands thoroughly.
• Make sure that the breast pump was pre-cleaned and dried. If not, follow the section Cleaning and
Sterilising.
• Make sure that there is no dirt, liquid or moisture in the silicone tubing. Never switch on the breast pump
if you notice water in the silicone tube.
Note! Do not mouth blow the silicone tube to remove water.
Place the breast pump on your breast so that the nipple is deep inside the funnel (exactly in the middle).
NOTE! The silicone cushion must cling tightly to the breast. Otherwise, the suction may be reduced.
1. Sit comfortably.
2. Make sure the batteries in the breast pump are charged.
3. Touch the ON/OFF icon to start pumping. When rst used, the breast pump will switch on to the rst
suction level in the stimulation mode. Each time it is switched on again, the device will start using the
settings that were used during the previous use.
4. You can choose from two available modes:
• Stimulation phase (displayed as two circles) – a massage stimulating milk let-down. The mode has 9
levels of suction power. You can press the „+” button to increase the suction power or „-” to lower the
suction power. You can change a mode at any time by pressing the button
. After running for 2 minutes
in the stimulation phase, the breast pump will automatically switch to the expression phase at the level of
suction you used the last time.
• Expression mode (displayed as three circles) – for milk expression. Also in the expression mode, you can
choose one of 9 suction levels.
12_211reb_p_instrukcja laktator_elektr_ms001.indd 4-512_211reb_p_instrukcja laktator_elektr_ms001.indd 4-5 04.11.2022 13:02:5804.11.2022 13:02:58

Keskustele tuotteesta
Täällä voit jakaa mielipiteesi Canpol Mobile Electric Rintapumppu:sta. Jos sinulla on kysyttävää, lue ensin huolellisesti käyttöohje. Käsikirjaa voi pyytää yhteydenottolomakkeellamme.