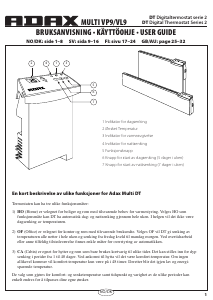
Käyttöohje Adax Multi Digital DT Termostaatti

Tarvitsetko käyttöoppaan Adax Multi Digital DT Termostaatti? Alta voit katsoa ja ladata suomenkielisen PDF-oppaan ilmaiseksi. Tällä tuotteella on tällä hetkellä 2 usein kysyttyä kysymystä, 0 kommenttia ja 0 ääntä. Jos tämä ei ole haluamasi käyttöopas, ota meihin yhteyttä.

Onko tuotteessa vika, eikä käyttöoppaasta ole apua? Siirry Repair Café ‑alueelle etsimään ilmaisia korjauspalveluita.

Käyttöohje

Loading…
Digital thermostat User Guide
18°C 20°C
= 2°C deviation
(24 hours)
Multi Digital DT
20°C 20°C
www.adax.no
Print no. 62446
131005
English
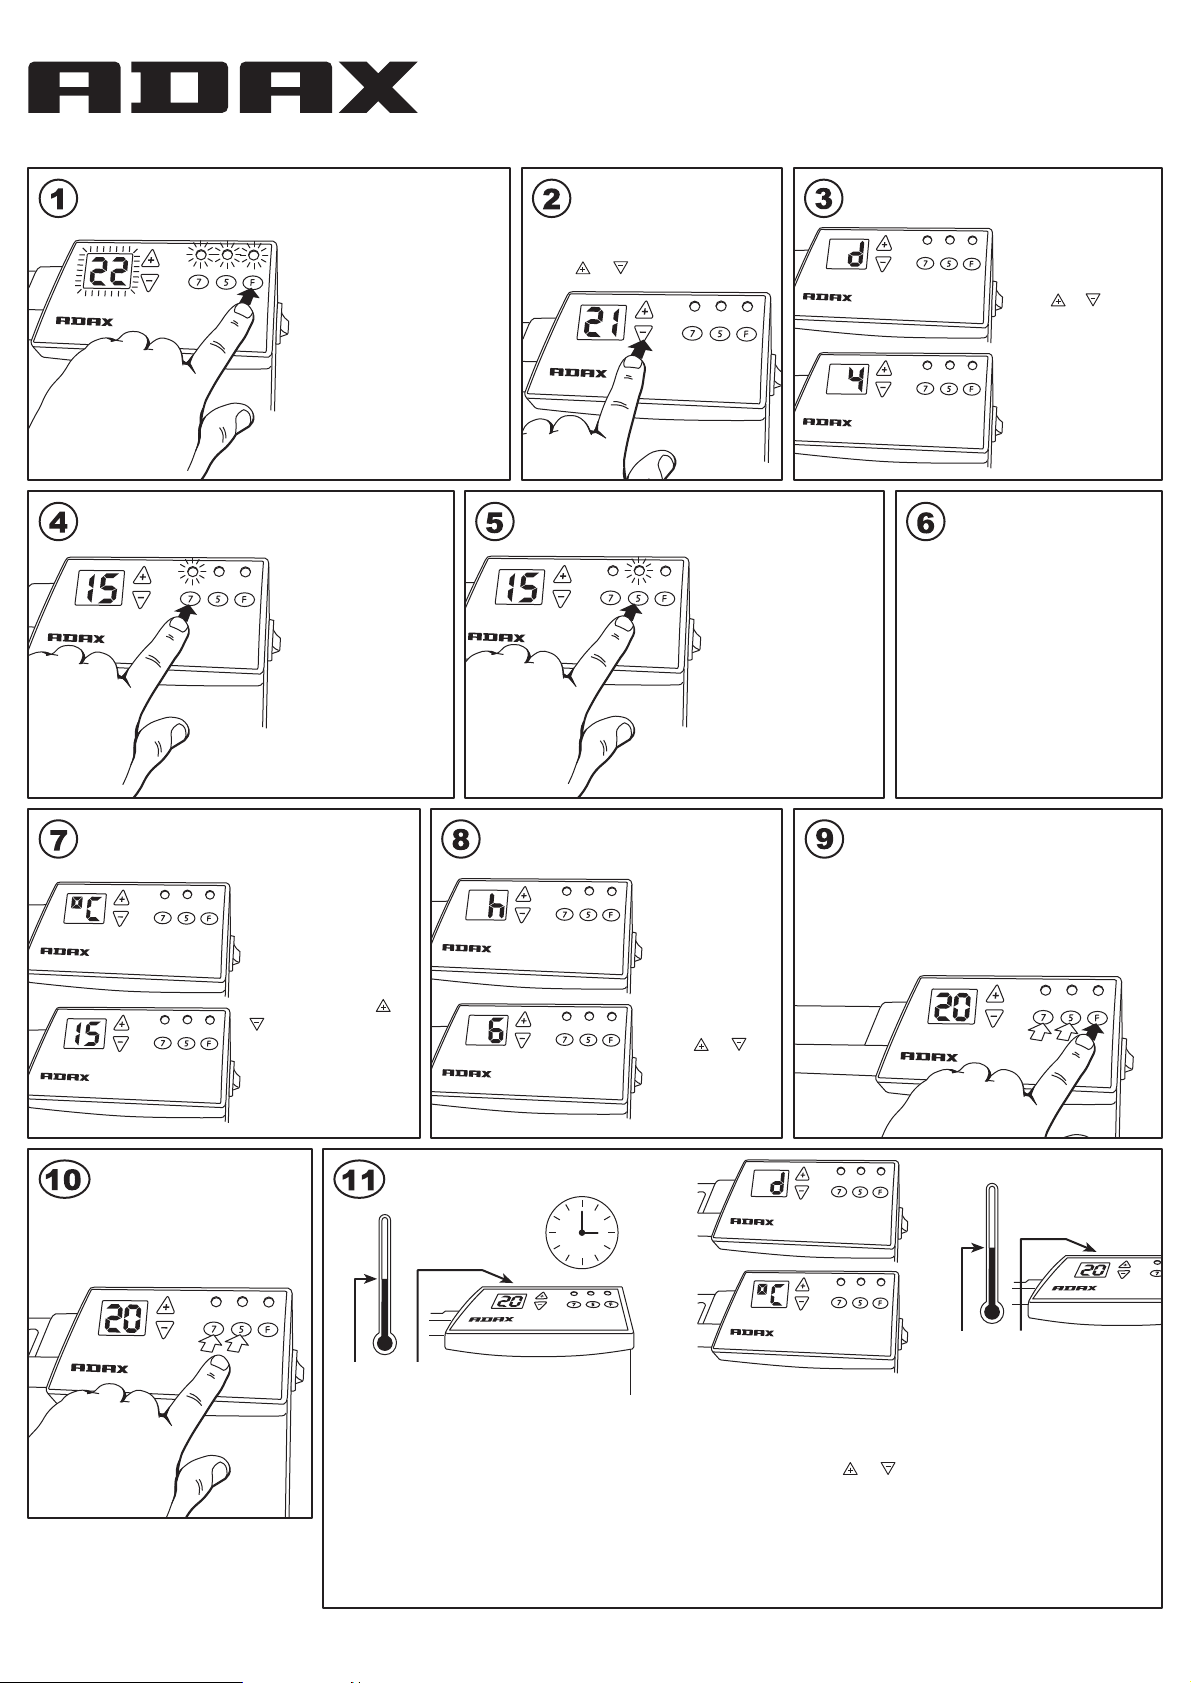
When putting Multi Digital DT
into operation or after a
lengthy power cut, the display
will flash, showing that no
temp. reduction programme
is active. Press “F” to reset
and DT will revert to the
default settings: 22°C for
normal temp. and 15°C for
reduced temp. The duration
of temp. reduction is 7 hours
at night and 5 hours during
the day. Temp. reduction is
not activated.
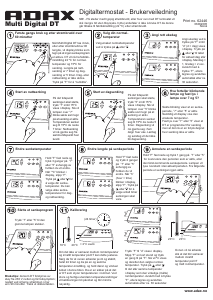
First time use and after power cuts of over
60 minutes
Select the normal
temperature setting
Choose the desired normal
temperature by pressing
or .
Set the correct day of the week
Set the correct week-
day by pressing ”F”
until ”d” (d = day) is
shown in the display.
Press or until the
appropriate figure is
displayed.
Monday = 1, tues-
day = 2 etc. Store the
setting by pressing
”F”, or allow it to be
stored automatically
after appr. 30
seconds.
Start nighttime temperature reduction
At the time you wish
temp. reduction to start,
press ”7” until 15ºC
is displayed. The lamp
over ”7” will now flash
slowly to indicate that
temp. reduction is
active. The temperature
is lowered to 15ºC for
the next 7 hours. This
will now be repeated at
the same time every
night.
Start daytime temperature reduction
What do flashing lights
and steady lights over
7 and 5 indicate?
Slow flashing shows that a temp.
reduction period, ”7” or ”5” is
ongoing. At the same time the
display will show the temp.
setting. A steady light over ”7”
eller ”5” shows that DT is
programmed for temp. reduction,
but that it is not currently in an
active period.
Change the temp. reduction setting
Hold down on ”F” and
press 3 times on ”7”
eller ”5” depending on
which you wish to
change. When ”ºC”
flashes in the display,
release ”F”. Press or
to choose your
desired temp. You can
select different daytime
and nighttime settings.
Alter the duration
of temp. reduction
Hold down on ”F”
and press twice
on ”7” or ”5”
depending on
which you wish
to alter. When ”h”
(hour) flashes
in the display,
release ”F”.
Press or to
choose the
number of hours
you wish temp.
reduction to last.
Hold down on ”F” and press once on ”7” or ”5” to
override the current active period, or the next period
of temp. reduction. The lamp is lit steadily for the
period in question. Temp. reduction will resume
as usual from the following period.
Annul a period of temp. reduction
Delete a period of
temp. reduction
Press ”7” or ”5” until the green
lamp is extinguished.
Calibration
Should the actual room temperature and the
DT’s setting not correspond, DT should be
calibrated. First let the heater work steadily
at the same temperature setting, preferably
for at least 24 hours, keeping doors and
windows closed. This makes certain that it
is DT that is controlling room temperature.
Sudden, big changes in outdoor temperature
will affect calibration, making it less precise.
Press “F” until “d” is displayed.
Release ”F” for a moment then
press it once more. ºC will be
displayed, and then the setting
for normal temp. Press or
until the display shows the same
as the actual measured room
temperature. Store by pressing
“F”, or let the new setting be
automatically stored after appr.
30 seconds.
The heater will now work with
the temperature displayed by
DT matching the actual
temperature attained in the
room.
At the time you wish
temp. reduction to start,
press “5” until 15ºC is
displayed. The lamp over
“5” will now flash slowly
to indicate that temp.
reduction is active. The
temperature is lowered
to 15ºC for the next 5
hours. This will now be
repeated at the same
time from Monday to
Friday, leaving Saturday
and Sunday unaffected.
NB! In locations with frequent power cuts, or where heaters are to
remain unattended for longer periods (e.g. holiday homes), we
recommend that DT not be used as it reverts to the default setting
(22°C) after a power cut.
Lataa käyttöohje suomalainen (PDF, 1.04 MB)
(Mieti ympäristöä ja tulosta tämä käyttöopas vain, jos se on todella tarpeen)

Loading…

Arviointi

Kerro meille mielipiteesi Adax Multi Digital DT Termostaatti arvioimalla tuote. Haluatko jakaa tuotekokemuksesi tai kysyä kysymyksen? Jätä kommentti sivun alalaidassa.
Oletko tyytyväinen kohteeseen Adax Multi Digital DT Termostaatti?
Kyllä Ei
Arvostele tuote ensimmäisenä
0 äänet

Keskustele tuotteesta

Täällä voit jakaa mielipiteesi Adax Multi Digital DT Termostaatti:sta. Jos sinulla on kysyttävää, lue ensin huolellisesti käyttöohje. Käsikirjaa voi pyytää yhteydenottolomakkeellamme.

Lisää tästä ohjekirjasta

Ymmärrämme, että on mukavaa, että sinulla on paperikäyttöinen käyttöopas laitteellesi Adax Multi Digital DT Termostaatti. Voit aina ladata oppaan verkkosivuiltamme ja tulostaa sen itse. Jos haluat alkuperäisen käyttöoppaan, suosittelemme ottamaan yhteyttä osoitteeseen Adax. He saattavat pystyä toimittamaan alkuperäisen ohjekirjan. Etsitkö laitteen Adax Multi Digital DT Termostaatti käyttöopasta toisella kielellä? Valitse haluamasi kieli kotisivuiltamme ja etsi mallinumero nähdäksesi, onko sitä saatavilla.

Tekniset tiedot

Tuotemerkki Adax
Malli Multi Digital DT
Kategoria Termostaatit
Tiedostotyyppi PDF
Tiedoston koko 1.04 MB

Kaikki käsikirjat kohteelle Adax Termostaatit
Lisää Termostaatit käsikirjoja

Usein kysytyt kysymykset kohteesta Adax Multi Digital DT Termostaatti

Tukitiimimme etsii hyödyllisiä tuotetietoja ja vastaa yleisiin kysymyksiin. Jos huomaat yleisissä kysymyksissä virheen, kerro siitä meille yhteydenottolomakkeella.

Mikä on termostaatin kuollut alue? Todennettu

Monilla moderneilla termostaateilla on kuollut alue. Jos lämpötila poikkeaa alle 4 ° C asetetusta lämpötilasta, järjestelmä ei kuumene tai jäähty. Termostaatin niin kutsuttu kuollut alue estää järjestelmää käynnistymästä ja sammumasta liian usein, mikä säästää energiaa.

Tästä oli apual (1756) Lue lisää

Mikä on paras paikka asentaa termostaatti? Todennettu

Paras paikka termostaatille on noin 1,5 metriä maanpinnan yläpuolella. Älä koskaan aseta termostaattia radiaattorin tai muun lämpöä lähettävän laitteen päälle tai suoraan auringonvaloon. Valitse huone, jota käytetään usein. Useimmissa tapauksissa tämä on olohuone.

Tästä oli apual (1128) Lue lisää
Käyttöohje Adax Multi Digital DT Termostaatti

Liittyvät tuotteet

Aiheeseen liittyvät luokat

×
Download