
8
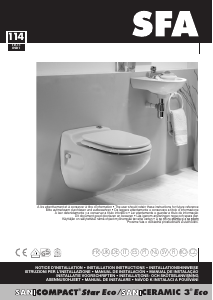
MOUNTING THE PAN AND
CUTTING OUT THE FASCIA
PANEL
1 - Offer up the fascia panel (not provided) to
the support frame which has been fixed
to the wall.
2 - Locate the panel exactly to the support
frame.
3
- Drill 2 holes (25mm) through the fascia
panel to correspond with the threaded
rods on which the pan will hang.
4
- Offer up the template
E
to the support
wall fascia, positioning the holes for the
WC support rods accordingly.
5 - Trace the inner shape of the template
onto the fascia.
6
- Remove the template
E
and cut out the
fascia as traced.
7
- Make any finishes to the support wall and
fix on the fascia panel.
8 - Note: If you are tiling the wall, the tiles will
have to be cut out in the same way as the
fascia panel.
9
CONNECTIONS
WARNING: Before making the various
connections, check the following:
1
- Ensure that the threaded rods are
correctly spaced and the dimensions in
drawing 7a adhered to, otherwise the
screw covers will not fit.
2
- Put the template
E
in place onto the
threaded rods.
9a
CONNECTION OF WASH HAND BASIN
1 - Saw off the tip of the inlet spigot.
De-burr it.
2 - Connect the rubber waste connection
I
to the spigot with the correct clip
J
and crimp it with pincher pliers.
3 - Connect the other end of the connec-
tor
I
to the 40 mm end of washbasin
waste pipe and secure it with clip
K
.
9b
DISCHARGE CONNECTION
1 - Slide tube
F
onto the discharge
connector.
2 - Fix the non-return valve
G
with clip
H
to
the discharge pipe.
3 - WARNING: The non-return valve must
be installed vertically with the arrow
pointing upwards.
4 - Stretch the connector and fix the end to
the non-return valve using clip
H
.
9C CONNECTION OF THE WATER SUPPLY
Connect the water supply pipe to the water
inlet pipe (male to female iron connection).
15
CARE OF YOUR
SANICOMPACT
®
STAR/
SANICERAMIC 3
®
• Normal household bleaches/WC cleansers
can be used with a SANICOMPACT
®
Star/
SANICERAMIC 3
®
• To avoid the build up of limescale in the
unit, use the following procedure.
- disconnect the power supply to the unit,
- pour 3 or 4 litres of water mixed with a
strong solution of descalent/spirit of salts
into the WC pan,
- leave it to stand for 1 or 2 hours, then
re-connect the electric supply,
- flush several times to clear.
The frequency of this operation will depend
on the hardness of the water in your locality.
We would recommend this be done about
twice a year.
13
COMPLETING
THE INSTALLATION
1 - Remount the pan onto the threaded
rods.
2 - Fit the white UPVC washers
L
onto the
threaded rods and tighten the nuts
B
.
Then fit the nut covers
M
.
3 - Cut away any protruding lip of the
template around the pan contour.
4 - Seal the pan/wall joint with silicon.
17
GUARANTEE
The SANICOMPACT
®
Star/SANICERAMIC
3
®
range is guaranteed for 2 years, subject to
correct installation and usage.
11
NORM
10
MOUNTING THE PAN
Once the connections have been made,
1 - Fit the clear tubes
D
onto the threaded
rods.
2 - Set the pan onto the threaded rods wit-
hout tightening the nuts.
12
START-UP AND PROGRAMMING
12a
START-UP
1 - Plug it in the power socket. Wait 20
seconds: appliance initializing. Open the
water tap to rinse well. Start the normal
flush by pressing the dark grey side.
Put a few sheets of toilet paper down in
the bowl and flush again.
2 - Turn on the washbasin tap. The unit
should activate automatically.
3 - Demount the pan and check the water
tightness of all connections.
4 - WARNING: Any dripping of the taps will
cause the unit to activate automatically.
12b
PROGRAMMING
The length of your SANICOMPACT
®
Star/
SANICERAMIC 3
®
’s flush varies according to
which cycle you choose.
Eco flush (by default, light grey button):
19 seconds and 3.8L: rinsing of the bowl for
10 seconds, the pump works for 7 seconds
(for 7 seconds, the bowl continues to fill), then
the bowl fills again for 2 seconds.
You can lengthen the first rinse of the eco
flush to 16 seconds if the default flush is not
enough.
Normal flush (dark grey button):
25 seconds and 5L: The bowl is rinsed for
16 seconds, the pump works for 7 seconds
(for 7 seconds, the bowl continues to fill) then
the bowl fills again for 2 seconds.
To re-programme:
• Hold the ECO button (light grey button)
down for 5 seconds.
• The motor works for 2 seconds, this means
you have entered programming mode.
• Each time you press the dark grey button
you increase the length of the ECO flush
by 1 second: each time you press it will be
validated by the motor running for a short
period.
• Each time you press the grey button you
decrease the length of the flush by 1 second:
each time you press it will be validated by
the motor running for a short period.
To exit programming mode:
• Wait for 5 seconds without pressing any
buttons.
The motor runs for 2 seconds, this means
that you have left programming mode.
Comment 1: the minimum length of the first
rinsing flush for the normal flush is 19 seconds
(default programming)
and the maximum length is 25 seconds.
Comment 2: the normal flush cannot be
modified.
14
USAGE
1 - A WC fitted with a SANICOMPACT
®
Star/
SANICERAMIC 3
®
pump/macerator does
not require any special maintenance.
2 - WARNING: The SANICOMPACT
®
Star/
SANICERAMIC 3
®
range should only
be used for the evacuating of
normal human waste, toilet paper and
household WC cleansers.
Damage may occur to the machine if
the following are disposed of via the
WC; Cotton wool, tampons, sanitary
towels, wet wipes, kitchen towels,
condoms as well as other fabric or
hard objects. Solvents, acids and
other chemicals can also cause
damage to the unit, and will
invalidate the warranty.
3 -
WARNING: In the event that the unit is
not to be used for a prolonged time the
water supply to the bathroom is turned
off.
4 - This device is not designed for
persons (including children) with
limited physical, sensory or mental
abilities, or those with minimal
experience and knowledge, unless
they are monitored and are given
the necessary instructions for using
the device, with the help of a person
responsible for their safety. Monitor
children and make sure they do not
play with the device.
16
AFTER SALES SERVICE
In the unlikely event of a failure or
malfunction, please call our after sales
service department. You will be directed to
your nearest registered service engineer.
WARNING: Always disconnect the electricity
supply before attempting any work on the
SANICOMPACT
®
Star/SANICERAMIC 3
®
.


Keskustele tuotteesta
Täällä voit jakaa mielipiteesi Sanibroyeur SANICOMPACT Star WC:sta. Jos sinulla on kysyttävää, lue ensin huolellisesti käyttöohje. Käsikirjaa voi pyytää yhteydenottolomakkeellamme.
vastaa | Tästä oli apual (0) (Googlen kääntämä)