
2
• Audio settings on your Xbox will control the audio delivered to your headphones. Refer to
your Xbox and headphone documentation for additional details.
• To avoid hearing damage, do not use high volume settings for an extended period
oftime.
SETTING TRIGGER DEPTH
• Adjust the trigger pull depth by sliding the trigger lock under each trigger to the left or
right.
• The pull depth of each trigger can be set independently.
PROFILE CONTROL
1. Quick-tap the PROFILE/PROGRAM button to cycle through prole settings for T1/T2/T3
trigger locks. The Xbox Fusion Pro 4 Wired controller can store up to 3 proles at a time
locally. The rst 3 proles set by default adjust the deadzone settings for the triggers.
• Prole 1 is 99% deadzone and is the quickest maximum value setting (use for T1 trigger
lock).
• Prole 2 is 50% deadzone (use for T2 trigger lock).
• Prole 3 is no deadzone/full-throw trigger pull (use for T3 trigger lock).
Each press of the PROFILE/PROGRAM button will change to the next prole and then
repeat the cycle: 3 ➞ 1 ➞ 2 ➞ 3
2. The top housing LED indicator will quickly ash the number of times related to the prole
version to signal a prole has been changed and then return to solid.
3. To clear the proles or change the settings, please use the PowerA Gamer HQ app. The
above 3 default settings will be saved as legacy settings (Prole 1 / Prole 2 / Prole
3) in the PowerA Gamer HQ app. The app can store hundreds of custom prole settings
that can be pushed to the controller, but the controller can only store 3 at any given time
chosen from the app.
TROUBLESHOOTING
For current FAQs, visit PowerA.com/support.
Q: Controller will not connect to Xbox console?
A: Confirm your Xbox console is powered “ON”.
A: Confirm your TV is set to the proper video input and that you can see the Xbox console
interface on your TV screen.
A: Confirm cable is properly connected to yourXbox console.
A: Confirm cable is properly connected to your PowerA Advantage Wired Controller.
Q: Controller is connected but has no function?
A: Confirm you are using the Player #1 controller.
For more troubleshooting refer to your Xbox console User Guide.
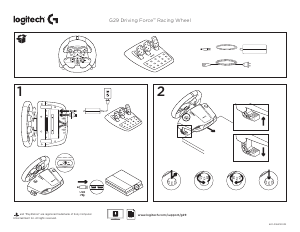
CONTENTS
• PowerA Advantage Wired Controller for Xbox
• Detachable 10 ft USB Cable
• User Manual
SET UP
1. If your Xbox is off, connect the USB cable between an available USB port on your console
and the USB-C port on your controller. Press the Xbox Button on the controller until
the console powers on. The small white LED will illuminate toindicate a successful
connection.
2. If your Xbox console is already on, simply connect the USB cable into any available USB
port on the console and connect the USB-C to your controller. The small white LED light
should illuminate indicating a successful connection.
NOTE: For player and controller assignment, reference your official Xbox users manual.
ASSIGNING THE ADVANCED GAMING BUTTONS
1. Press the Program Button on the back of the controller. The LED Connection Indicator will
flash, signaling the controller is in Assign Mode.
1,2,3
2. Press one of the following buttons (A/B/X/Y/LT/RT/LB/RB/Left Stick Press/Right Stick
Press/+Control Pad) you wish to assign to an Advanced Gaming Button. Thenpress
the Advanced Gaming Button (AGR or AGL) that you wish to perform that function. The
Connection / Program LED will stop ashing, signaling the Advanced Gaming Button has
been set.
3. Repeat for the remaining Advanced Gaming Button.
NOTE: Advanced Gaming Button assignments will remain in memory even after
disconnected.
RESETTING THE ADVANCED GAMING BUTTONS
1. Hold the Program Button down for 2 seconds. The LED Connection Indicator will slowly
flash signaling the controller is in Assign Mode.
2. Press either AGL or AGR to individually reset each button, or hold down the Program
Button for 5 seconds to reset both simultaneously.
USING THE SHARE BUTTON
Refer to Xbox documentation for details on functions and features related to the Share
Button.
ATTACHING HEADPHONES
• For audio, fully insert the 3.5mm plug of your headphones (or headset/earbuds) into the
3.5 mm audio jack of the wired controller.
• Adjust the volume using the Audio settings in Xbox Settings and audio controls on your
headphones.
Menu Button
Share Button
A/B/X/Y
Buttons
Xbox Button
View
Button
D-Pad
Detachable
10ftUSBCable
Trigger Lock
Prole/Program
Button
Trigger Lock
Headset Jack
Advanced
GamingButtons
ENGLI S H
Connection
Indicator LED
The Gamer HQ app can be used to test, calibrate, and customize settings
on your controller. With your controller connected to Xbox or Windows 10/11
PC via USB-C cable you can:
• Update rmware to the to the latest version
• Test your controller’s buttons and analog controls, vibration
functionality, and audio
• Recalibrate analog inputs for proper control response
• Set trigger and thumbstick deadzone/active area
• Set game-chat volume balance and vibration intensity
• Remap buttons (including Advanced Gaming Buttons)
ACCO Brands USA, LLC 4 Corporate Drive, Lake Zurich, IL 60047
ACCOBRANDS.COM | POWERA.COM | MADE IN CHINA
ADDITIONAL LEGAL
© 2025 ACCO Brands. All Rights Reserved. PowerA and PowerA Logo are trademarks of
ACCO Brands. Microsoft, Xbox, Xbox “Sphere” Design, Xbox Series X|S, Xbox One, and
Windows are trademarks of the Microsoft group of companies. Allother trademarks are the
property of their respective owners.
USB-C
®
is a registered trademark of USB Implementers Forum.


Keskustele tuotteesta
Täällä voit jakaa mielipiteesi PowerA XBGPADWI Xbox Peliohjain:sta. Jos sinulla on kysyttävää, lue ensin huolellisesti käyttöohje. Käsikirjaa voi pyytää yhteydenottolomakkeellamme.