
Note: The shaver does not run from the mains.
When the battery is empty, you have to
recharge the battery before you can use the
shaver again.
Cordless shaving time
A fully charged shaver has a cordless shaving
time of approximately 30 minutes.
Using the appliance
Note: The shaver cannot be used directly from
the mains.
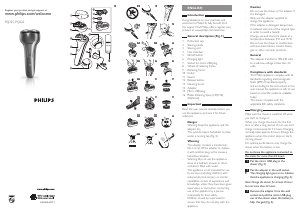
1 Remove the protection cap.
2 Press the on/off button to switch on
the shaver (Fig. 6).
3 Move the shaving heads over your
skin. Make both straight and circular
movements (Fig. 7).
Note: Shave on a dry face only. Do not use the
shaver in combination with gel, foam or water.
Note: Your skin may need 2 or 3 weeks to get
accustomed to the Philips shaving system.
4 Press the on/off button to switch off
the shaver.
5 Clean the shaver after every
shave (see chapter ‘Cleaning and
maintenance’).
6 Put the protection cap on the shaver
to prevent damage and to avoid
dirt accumulation in the shaving
heads (Fig. 8).
Note: Make sure that the lug of the protection
cap covers the release button.
Cleaning and maintenance
Never use scouring pads, abrasive cleaning
agents or aggressive liquids such as petrol
or acetone to clean the appliance.
Clean the shaver after every shave to
guarantee better shaving performance. For
the best cleaning result, we advise you to
use Philips Cleaning Spray (HQ110). Ask
your Philips dealer for information.
Note: Philips Shaving Head Cleaning
Spray (HQ110) may not be available in all
countries. Contact the Consumer Care Centre
in your country about the availability of this
accessory.
After every shave: shaving unit
and hair chamber
1 Switch off the shaver, remove the
adapter from the wall socket and pull
the micro USB plug out of the shaver.
2 Clean the top of the appliance with
the cleaning brush supplied (Fig. 9).
3 Press the release button (1) and pull
the shaving unit in a straight upward
movement off the shaver (2). (Fig. 10)
4 Clean the inside of the shaving unit
with the cleaning brush (Fig. 11).
5 Clean the hair chamber with the
cleaning brush (Fig. 12).
6 Put the shaving unit back onto the
shaver (Fig. 13).
Every two months: shaving heads
Note: Do not use cleaning agents or alcohol
to clean the shaving heads. Only use Philips
Cleaning Spray (HQ110).
1 Switch off the shaver, remove the
adapter from the wall socket and pull
the small plug out of the shaver.
2 Press the release button (1) and pull
the shaving unit in a straight upward
movement off the shaver (2) (Fig. 10).
3 Turn the orange wheel anticlockwise
(1) and remove the retaining frame
(2) (Fig. 14).
4 Remove and clean one shaving head
at a time. Each shaving head consists
of a cutter and a guard (Fig. 15).
Note: Do not clean more than one cutter and
guard at a time, since they are all matching
sets. If you accidentally mix up the cutters
and guards, it may take several weeks before
optimal shaving performance is restored.
5 Remove the guard from the
cutter (Fig. 16).
6 Clean the cutter with the short-
bristled side of the cleaning brush.
Brush carefully in the direction of the
arrows (Fig. 17).
7 Clean the guard with the long-bristled
side of the cleaning brush (Fig. 18).
8 Put the cutter back into the guard
after cleaning (Fig. 19).
9 Put the shaving heads back into the
shaving unit (Fig. 20).
10 Put the retaining frame back into the
shaving unit (1) and turn the orange
wheel clockwise (2) (Fig. 21).
11 Put the shaving unit back onto the
shaver (Fig. 13).
Storage
Keep the appliance dry.
Use and store the appliance at a
temperature between 5°C and 35°C.
1 Switch off the shaver.
2 Put the protection cap on the shaver
after use to prevent damage and to
avoid dirt accumulation in the shaving
heads (Fig. 8).
Note: Make sure that the lug of the protection
cap covers the release button.
Replacement
Replace the shaving heads every two years
for optimal shaving results.
Replace damaged or worn shaving heads
with Philips shaving heads only (HQ4+ for
China or HQ56 for the rest of the world).
For instructions on how to remove the
shaving heads, see chapter ‘Cleaning and
maintenance’, section ‘Every two months:
shaving heads’.
Accessories
To retain the top performance of your
shaver, make sure you clean it regularly
and replace its shaving heads at the
recommended time.
Shaving heads
- We advise you to replace your shaving
heads every two years. Always replace
them with Philips shaving heads only
(HQ4+ for China or HQ56 for the
rest of the world) (Fig. 22).
Cleaning
- Use Philips Cleaning Spray (HQ110) to
clean the shaving heads thoroughly.
Environment
- Do not throw away the appliance
with the normal household waste at
the end of its life, but hand it in at an
ofcial collection point for recycling.
By doing this, you help to preserve the
environment (Fig. 23).
- The built-in rechargeable battery
contains substances that may pollute
the environment. Remove the battery
before you discard and hand in the
appliance at an ofcial collection point.
Dispose of the battery at an ofcial
collection point for batteries. If you
have trouble removing the battery, you
can also take the appliance to a Philips
service centre. The staff of this centre
will remove the battery for you and will
dispose of it in an environmentally safe
way (Fig. 24).
Removing the rechargeable
battery
Only remove the rechargeable battery
when you discard the shaver. Make
sure the battery is completely empty
when you remove it.
1 Remove the adapter from the wall
socket and pull the micro USB plug
out of the shaver.
2 Let the shaver run until it stops and
undo the screw at the back of the
shaver (Fig. 25).
3 Remove the back panel of the shaver
with a screwdriver.
4 Remove the rechargeable battery.
Do not connect the shaver to the mains
again after you have removed the battery.
Guarantee and service
If you need service or information or if
you have a problem, please visit the Philips
website at www.philips.com/support or
contact the Philips Consumer Care Centre
in your country. You nd its phone number
in the worldwide guarantee leaet. If there
is no Consumer Care Centre in your
country, go to your local Philips dealer.
Guarantee restrictions
The shaving heads (cutters and guards)
are not covered by the terms of the
international guarantee because they are
subject to wear.
DANSK
Introduktion
Tillykke med dit køb og velkommen til
Philips! For at få fuldt udbytte af den
support, Philips tilbyder, skal du registrere dit
produkt på www.philips.com/welcome.
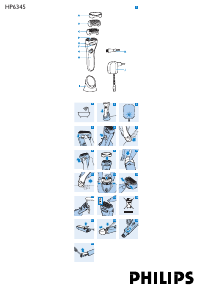
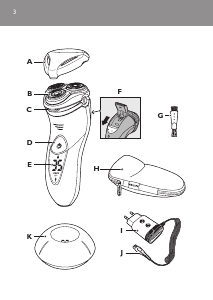
Generel beskrivelse (fig. 1)
1 Beskyttelseskappe
2 Skær
3 Skærhoved
4 Skægkammer
5 On/off-knap
6 Opladeindikator med lys
7 Port til mikro-USB-stik
8 Hjul på samleramme
9 Samleramme
10 Skærenhed
11 Kappe
12 Udløserknap
13 Rensebørste
14 Adapter
15 Mikro-USB-stik
16 Philips Cleaning Spray (HQ110)
(ekstraudstyr)
Vigtigt
Læs denne brugsvejledning omhyggeligt
igennem, inden apparatet tages i brug, og
gem den til eventuelt senere brug.
Fare
- Advarsel: Både apparat og adapter skal
holdes tørre.
- Dette symbol betyder: Må ikke
rengøres under rindende vand (g. 2).
Advarsel
- Adapteren indeholder en transformer.
Adapteren må ikke klippes af og
udskiftes med et andet stik, da dette vil
forårsage en farlig situation.
- Advarsel: Brug ikke apparatet i
nærheden af et badekar, brusebad eller
andre beholdere fyldt med vand.
- Dette apparat er ikke beregnet til at
blive brugt af personer (herunder
børn) med nedsatte fysiske og mentale
evner, nedsat følesans eller manglende
erfaring og viden, medmindre de
er blevet vejledt eller instrueret i
apparatets anvendelse af en person, der
er ansvarlig for deres sikkerhed.



Keskustele tuotteesta
Täällä voit jakaa mielipiteesi Philips PQ225 Parranajokone:sta. Jos sinulla on kysyttävää, lue ensin huolellisesti käyttöohje. Käsikirjaa voi pyytää yhteydenottolomakkeellamme.