Käyttöohje Black and Decker KR504RE Iskuporakone

Tarvitsetko käyttöoppaan Black and Decker KR504RE Iskuporakone? Alta voit katsoa ja ladata suomenkielisen PDF-oppaan ilmaiseksi. Tällä tuotteella on tällä hetkellä 3 usein kysyttyä kysymystä, 0 kommenttia ja 0 ääntä. Jos tämä ei ole haluamasi käyttöopas, ota meihin yhteyttä.

Onko tuotteessa vika, eikä käyttöoppaasta ole apua? Siirry Repair Café ‑alueelle etsimään ilmaisia korjauspalveluita.

Käyttöohje

Loading…

7
ENGLISH
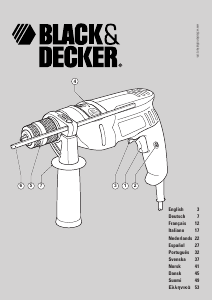
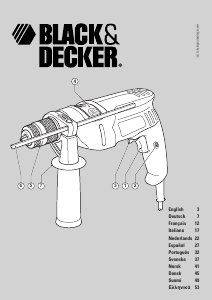
Features
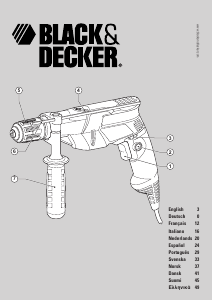
1. Variable speed switch
2. Lock-on button
3. Forward/reverse button
4. Drilling mode selector
5. Chuck
6. Depth stop (not all models)
7. Side handle (not all models)
fig. B
8. Manual spindle lock button (single sleeve keyless
chuck only)
Assembly
Warning! Before assembly, make sure that the tool is
switched off and unplugged.
Fitting the side handle and depth stop (fig. A & G)
Turn the grip counter clockwise until you can slide the
side handle (7) onto the front of the tool as shown.
Rotate the side handle into the desired position.
Insert the depth stop (6) into the mounting hole as
shown.
Set the drilling depth as described below.
Tighten the side handle by turning the grip clockwise.
Fitting a drill bit
Single sleeve keyless chuck (fig. B)
Open the chuck by pressing the manual spindle lock
button (8) and turning the sleeve (9) counter clockwise.
Insert the bit shaft (12) into the chuck.
Firmly tighten the chuck by pressing the manual spindle
lock button (8) and turning the sleeve clockwise until it
is tight.
Two sleeve keyless chuck (fig. C)
Open the chuck by turning the front part (10) with one
hand while holding the rear part (11) with the other.
Insert the bit shaft (12) into the chuck and firmly tighten
the chuck.
Keyed chuck (fig. D)
Open the chuck by turning the sleeve (11) counter
clockwise.
Insert the bit shaft (12) into the chuck.
Insert the chuck key (14) into each hole (15) in the side
of the chuck and turn clockwise until tight.
Removing and refitting the chuck (fig. E)
Open the chuck as far as possible.
Remove the chuck retaining screw, located in the
chuck, by turning it clockwise using a screwdriver.
Tighten an Allen key into the chuck and strike it with a
hammer as shown.
Remove the Allen key.
Remove the chuck by turning it counter clockwise.
To refit the chuck, screw it onto the spindle and secure
it with the chuck retaining screw.
Residual risks
Additional residual risks may arise when using the tool which
may not be included in the enclosed safety warnings. These
risks can arise from misuse, prolonged use etc.
Even with the application of the relevant safety regulations
and the implementation of safety devices, certain residual
risks cannot be avoided. These include:
Injuries caused by touching any rotating/moving parts.
Injuries caused when changing any parts, blades or
accessories.
Injuries caused by prolonged use of a tool. When using
any tool for prolonged periods make sure you take
regular breaks.
Impairment of hearing.
Health hazards caused by breathing dust developed
when using your tool (example:- working with wood,
especially oak, beech and MDF).
Use
Warning! Let the tool work at its own pace. Do not overload.
Warning! Before drilling into walls, floors or ceilings, check
for the location of wiring and pipes.
Selecting the direction of rotation (fig. F)
For drilling
, use forward (clockwise) rotation.
To select forward rotation, push the forward/reverse
button (3) to the left position.
To select reverse rotation, push the forward/reverse
button to the right.
Warning! Never change the direction of rotation while the
motor is running.
Selecting the drilling mode
For drilling in masonry, set the drilling mode selector (4)
to the position.
For drilling in other materials, set the drilling mode
selector to the position.
Setting the drilling depth (fig. G)
Slacken the side handle (7) by turning the grip counter
clockwise.
Set the depth stop (6) to the desired position. The
maximum drilling depth is equal to the distance between
the tip of the drill bit and the front end of the depth stop.
Tighten the side handle by turning the grip clockwise.
Lataa käyttöohje suomalainen (PDF, 1.81 MB)
(Mieti ympäristöä ja tulosta tämä käyttöopas vain, jos se on todella tarpeen)

Loading…

Arviointi

Kerro meille mielipiteesi Black and Decker KR504RE Iskuporakone arvioimalla tuote. Haluatko jakaa tuotekokemuksesi tai kysyä kysymyksen? Jätä kommentti sivun alalaidassa.
Oletko tyytyväinen kohteeseen Black and Decker KR504RE Iskuporakone?
Kyllä Ei
Arvostele tuote ensimmäisenä
0 äänet

Keskustele tuotteesta

Täällä voit jakaa mielipiteesi Black and Decker KR504RE Iskuporakone:sta. Jos sinulla on kysyttävää, lue ensin huolellisesti käyttöohje. Käsikirjaa voi pyytää yhteydenottolomakkeellamme.

Lisää tästä ohjekirjasta

Ymmärrämme, että on mukavaa, että sinulla on paperikäyttöinen käyttöopas laitteellesi Black and Decker KR504RE Iskuporakone. Voit aina ladata oppaan verkkosivuiltamme ja tulostaa sen itse. Jos haluat alkuperäisen käyttöoppaan, suosittelemme ottamaan yhteyttä osoitteeseen Black and Decker. He saattavat pystyä toimittamaan alkuperäisen ohjekirjan. Etsitkö laitteen Black and Decker KR504RE Iskuporakone käyttöopasta toisella kielellä? Valitse haluamasi kieli kotisivuiltamme ja etsi mallinumero nähdäksesi, onko sitä saatavilla.

Tekniset tiedot

Tuotemerkki Black and Decker
Malli KR504RE
Kategoria Iskuporakoneet
Tiedostotyyppi PDF
Tiedoston koko 1.81 MB

Kaikki käsikirjat kohteelle Black and Decker Iskuporakoneet
Lisää Iskuporakoneet käsikirjoja

Usein kysytyt kysymykset kohteesta Black and Decker KR504RE Iskuporakone

Tukitiimimme etsii hyödyllisiä tuotetietoja ja vastaa yleisiin kysymyksiin. Jos huomaat yleisissä kysymyksissä virheen, kerro siitä meille yhteydenottolomakkeella.

Miten iskuporakone ja poravasara eroavat toisistaan? Todennettu

Iskuporakoneella voidaan porata reikiä tiili- ja harkkoseiniin. Betoniseiniin poraamiseen tarvitaan poravasara.

Tästä oli apual (109) Lue lisää

Pitääkö minun käyttää kuulosuojaimia käytettäessä poraa? Todennettu

Kyllä sinun pitäisi. Vaikka poran tuottama melun määrä voi vaihdella merkkien ja mallien välillä, pitkäaikainen altistuminen kovalle melulle voi aiheuttaa pysyviä kuulovaurioita. Siksi on hyvä käyttää kuulosuojaimia.

Tästä oli apual (22) Lue lisää

Voinko säilyttää sähkötyökaluja vajassa tai autotallissa? Todennettu

Yleensä sähkötyökaluja voi säilyttää vajassa tai autotallissa, vaikka se joskus jäätyy siellä. Sähkötyökalun käyttöiän kannalta on kuitenkin parempi säilyttää se kuivassa paikassa ilman suuria lämpötilanvaihteluita. Aitassa tai autotallissa lämpötilaerot voivat aiheuttaa kondenssiveden muodostumista, joka voi aiheuttaa ruostetta. Lisäksi paristoilla toimivat työkalut kestävät lyhyemmin eivätkä lataudu yhtä hyvin hyvin alhaisissa lämpötiloissa. Lue käyttöopas aina huolellisesti, jotta voit olla varma siitä, miten sähkötyökalusi tulee säilyttää.

Tästä oli apual (5) Lue lisää
Käyttöohje Black and Decker KR504RE Iskuporakone

Liittyvät tuotteet

Aiheeseen liittyvät luokat